SnapIT: Automatically searching for text extracted from an image
You can combine the Populate Search Matches action described in Populating the Knowledge Search collection with the ability to extract text from an image using Optical Character Recognition (OCR) technologies described in Extracting text from images as part of a process to provide a feature we call SnapIT. SnapIT enables your end-users to search for text extracted from an image as part of a process. For example, if an error message appears to an end-user, they could screen-capture or photograph the message, log an incident with this image as an attachment attribute, and automatically be provided with suggested solutions to the error.
This section describes how to extract text from an image and search the knowledge database for this text as part of an Incident process. You could use similar techniques to use this functionality in other modules.
We recommend that you build this solution step-wise, ensuring that each part is working before moving on to the next part. First, implement the extraction of text from an image.
OCR system settings
The OCR technology used (Abbyy) is hosted in the cloud, and you need to subscribe and register an account at abbyy.com for your organization to use it. You then need to create an application on the Abbyy web site for your system to use.
To enter your organization's OCR application details:
- In the Ivanti Console, on the Settings menu, click System.
The System Settings appear. - Under OCR Api Settings, set the following values:
Url – the URL for the OCR web service. Set this to https://cloud.ocrsdk.com/
Account ID – your Abbyy application name.
Account Password – your Abbyy application password.
Maximum Wait Time – how long you want to wait for a response. We have found that after about 10 seconds any results returned are often of poor quality, so we recommend setting this value to 10. - Save the settings.
Setting the OCR behavior
When you have configured the OCR system settings, you can set up the object and attributes that will be used to store the image and its extracted text.
To set up the OCR behavior:
- Using Object Designer, add the OCR behavior to the object that you want to use the OCR functionality from.
For example, Incident Management\Incident. - Click OK and save the changes.
A new attribute is automatically added to the object called OCR Status. This attribute is used to record whether or not the OCR request worked. 0 = none, 1 = succeeded, 2 = failed.
Also, a new action is created that you can use in Process Designer called Extract text.
When you have created the object with the OCR behavior, you can configure the attributes that will store the image and its extracted text.
- Add an attribute to the object and set the attribute's Data Type to Attachment.
For example, OCR Attachment.
Make sure you leave the Attachment Type property set to None.
- Set the Enable text extraction? property for the attribute to True and save the changes.
A new attribute is added to the object, called Text from attribute title.
For example, Text from OCR attachment. This is the attribute that will store the text extracted from the image.
You can change the text of the Extract text action (and add multilingual versions) using the Business Objects tree in Process Designer. For more information about using Process Designer, see Process Designer, for more information about creating a multilingual system, see Designing a multilingual system.
You can add the Enable text extraction? property to more than one attachment attribute on the same object. In this instance, each attribute will have its own Text from... attribute, but will use the same Extract text action.
Designing the window and process for the text extraction
When you have set up the OCR System Settings, and set the OCR behavior on the required object, you can design the required window and process for the text extraction.
To create the window and process:
- Using Window Manager, add the OCR Attachment and Text from OCR attachment attributes to the Incident window.
You could also add the OCR Status attribute to the window during the design phase, to help with any debugging. However, we recommend removing the OCR Status attribute again before migrating the design to your live version. You could also extend your process to log an incident if the OCR Status returned is 2.
- In Process Designer, create a new process under Incident Management\Incident.
For information about using Process Designer, see Process Designer.
- Expand the Toolbox (
 ), and drag
  onto the workspace.
 - Drag an Automatic Instance Action onto the workspace.
The Select Action dialog appears. - Select Extract Text, then click OK.
The dialog closes, and the text on the Automatic Instance Action updates. - Drag a Start Status onto the workspace.
The Select Status dialog appears. - Select Open, then click OK.
- Link the to the Extract Text action, and the Extract Text action to the Open status.
- Complete the process as required, then save and activate it.

- In Web Access, add a process shortcut to the process you have created.
For information about adding shortcuts to Web Access, see Adding items to the shortcut bar. If you add the shortcut to Self Service, it will also be available in Ivanti Workspaces.
Now that you have completed your design, your users can use the new process to search for text extracted from an image.
To extract text from an image:
- Click the new shortcut to display the Incident window, and complete the mandatory fields.
- Click Choose File or Browse alongside the OCR attachment field (the label depends on the browser you are using) and select an image that contains text.
If you are using Workspaces on a device that has a suitable primary camera, you are given the option to choose an existing image, or to take a photograph.
- Save the Incident.
After a short while, the incident is saved, and the Text from OCR attachment field updates to include the text extracted from the image. If you have added the OCR Status field to the window, it reads 1 if the OCR request succeeded, or 2 if it failed.
Implementing SnapIT
When you have finished setting up the OCR functionality, you can set up the knowledge search functionality so that it automatically searches the knowledge database for the text stored in the Text from OCR attachment field.
To search the knowledge database for the extracted text:
- In Configuration Center, make sure that Background Service in the Configured Services section is started for the instance you are using.
The Background Service adds items to the knowledge database. - Add the Automatic Search behavior to Incident object.
See Populating the Knowledge Search collection for more information. - In Object Designer, select the Text from OCR attachment attribute, then in the Properties grid, under Knowledge Management, set Search Type to Is Natural Language, and Is AutoSearch? to True and save the changes.
- In Window Manager, add the Search Matches collection to the Incident window.
- In Process Designer, deactivate and open the process you designed earlier.
- Drag an Automatic Instance Action onto the workspace.
The Select Action dialog appears. - Select Populate Search Matches, then click OK.
The dialog closes, and the text on the Automatic Instance Action updates. - Connect the Populate Search Matches automatic action between the Extract Text automatic action and the Open status.
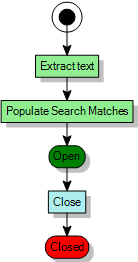
- Save and activate the process.
- In Web Access, log and save an incident using this process and attaching an image as before.
This time, the Text from OCR attachment field updates to include the text extracted from the image as before, but a Search Matches tab also appears at the bottom of the window. This tab contains the best matches from the knowledge search on the text extracted from the OCR attachment image and stored in the Text from OCR attachment field. You can open the items from this tab to view the details.
You could use a calculation to combine the results from the Search Matches tab into a single field using the new calculation function added for this release. For more information, see Using a calculation to create a single field from the Search Matches.
Using OCR with Mail
You can use the Mail component in Console to enable the process described above to be initiated by an e-mail. When you configure the mapping for the inbound e-mail, map the Attachment attribute in the Message Attributes tree to the OCR attachment attribute in the Business Attributes tree on the Mapping window.
For more information about configuring Mail, see Mail.